<?xml version="1.0" encoding="UTF-8"?>
<feed xmlns="http://www.w3.org/2005/Atom">
    <title>Make</title>
    <link rel="alternate" type="text/html" href="http://www.kylescholz.com/make/" />
    <link rel="self" type="application/atom+xml" href="http://www.kylescholz.com/make/atom.xml" />
    <id>tag:www.kylescholz.com,2011-08-24:/make/5</id>
    <updated>2013-02-22T00:10:10Z</updated>
    
    <generator uri="http://www.sixapart.com/movabletype/">Movable Type 5.01</generator>

<entry>
    <title>Wireless Sensing</title>
    <link rel="alternate" type="text/html" href="http://www.kylescholz.com/make/2013/02/moisture-sensor-wireless-relay.html" />
    <id>tag:www.kylescholz.com,2013:/make//5.40</id>

    <published>2013-02-22T00:01:25Z</published>
    <updated>2013-02-22T00:10:10Z</updated>

    <summary><![CDATA[I haven't posted about&nbsp;soil moisture sensors&nbsp;in ages, but I've completed a number of iterations and I thought it'd be fun to look over the evolution of the hardware. My goal has been to build a small, low power, inexpensive device,...]]></summary>
    <author>
        <name>kyle scholz</name>
        <uri>www.kylescholz.com</uri>
    </author>
    
    <category term="sensor" label="sensor" scheme="http://www.sixapart.com/ns/types#tag" />
    <category term="wireless" label="wireless" scheme="http://www.sixapart.com/ns/types#tag" />
    
    <content type="html" xml:lang="en-us" xml:base="http://www.kylescholz.com/make/">
        <![CDATA[<div>I haven't posted about&nbsp;<a href="http://www.kylescholz.com/make/2011/08/moisture-sensor.html">soil moisture sensors</a>&nbsp;in ages, but I've completed a number of iterations and I thought it'd be fun to look over the evolution of the hardware. My goal has been to build a small, low power, inexpensive device, that I can place in indoor and outdoor plants to collect soil moisture, light, and temperature readings. I shared some early information on sensors more than a year ago and will have more to share, but this post will focus on the wireless sensor relay.</div><div><br /></div><div>
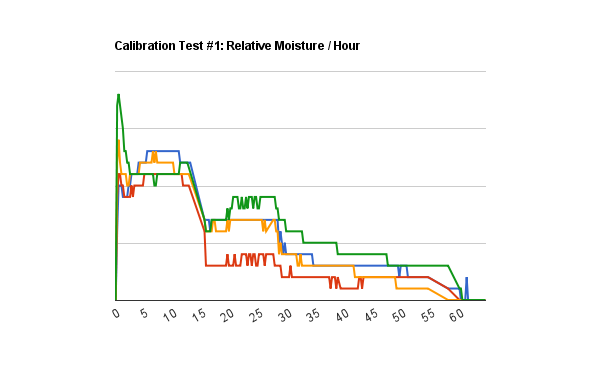
This device collects readings from one or more sensors at an interval (15 minutes), then broadcasts the readings to a receiver that uploads data to a store where I can crunch numbers, trigger alerts, and generate graphs.</div><div><br /></div><div><img alt="mote.jpg" src="http://www.kylescholz.com/make/2013/02/21/mote.jpg" width="600" height="427" class="mt-image-none" /></div><div><br /></div><div><br /></div>]]>
        <![CDATA[<div><b>Board</b></div><div><br /></div><div>Hobby-friendly PCB shops typically have a 2-week turn around. I'm new to this and wanted to prototype at my own pace, so I made my first boards on a CNC router. These are "channel isolation" boards, where an an outline is etched around the conductive channels on a copper clad board.</div><div><br /></div><div><img alt="IMG_20111229_190747.jpg" src="http://www.kylescholz.com/make/2012/01/03/cnc_pcb_1.png/IMG_20111229_190747.jpg" width="640" height="480" class="mt-image-none" /></div><div><font style="font-size: 0.8em;">CNC, ROUTING FINISHED, READY TO DRILL</font></div><div><br /></div><div>Ultimately, this enabled me to knock out a few boards in a weekend, but it required a lot of experimentation, tweaking, and router bits to get usable results. Producing a single board required a lot of effort to calibrate the CNC for two routing passes (for 2 sided boards) and drilling. A minor leveling or alignment issue would result in a useless board. Once I found a reasonable design, I moved over to a PCB shop, trading long turn-around times for less overall effort and more consistent results.</div><div><br /></div><div><b>Radios</b></div><div><br /></div><div>I experimented with a handful of different radios, but mostly focused on the TI CC2500 and Nordic NRF24L01. Both are available as ~12mm X 20mm modules with a trace antenna. The best price I found for the CC2500 at volume was about $2.00. The NRF24L01 was about twice that. The CC2500 was very inexpensive and has very low idle-time power consumption. But it required a lot of work to configure properly and handle errors. In my experience, it worked very poorly in the presence of noise from other CC2500s. The NRF24L01 worked out of the box, had better range, and was more resilient to interference. Ultimately, I tired of debugging the CC2500 and elected for the pricier NRF24L01.</div><div><br /></div><div><img alt="motes.jpg" src="http://www.kylescholz.com/make/2013/02/21/motes.jpg" width="600" height="507" class="mt-image-none" /></div><div><font style="font-size: 0.8em;">
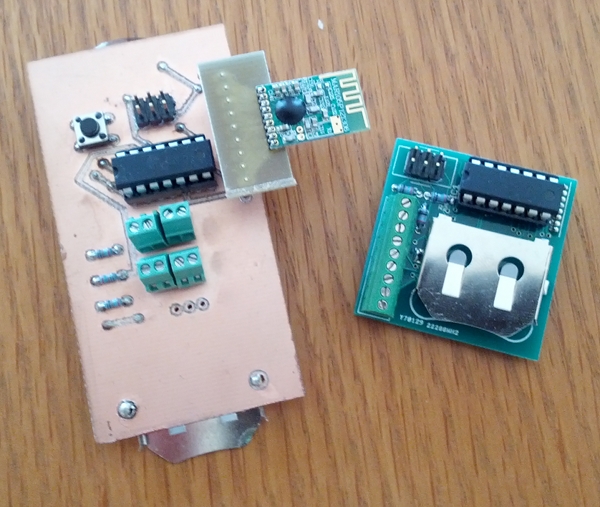
FIRST AND LAST ITERATIONS
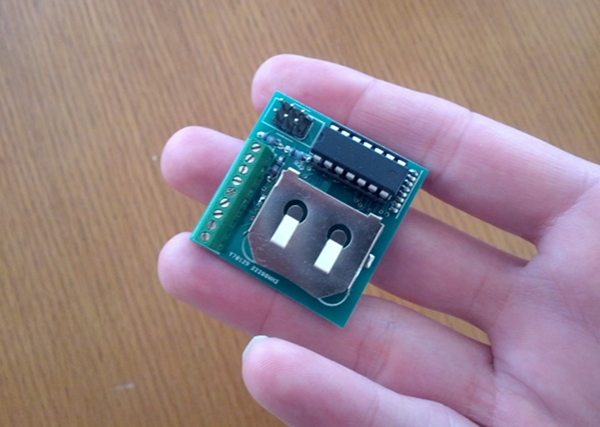
</font></div><div><b><br /></b></div><div><b>"Final" Product</b></div><div><br /></div><div>My latest iteration is a 1.45" square board, with screw terminals for any combination of 3 temperature, light, and moisture sensors. It uses the Nordic NRF24L01 2.4ghz radio with trace antenna, which gives it enough range to work anywhere inside or immediately outside my house. It runs on an Atmel AtTiny24 microcontroller. The sensor readings are taken from the AtTiny's on board ADC (Analog-to-Digital Converter). The whole unit is powered by a 3.3V battery. Sensing and reporting every 15 minutes, the battery should last 2-3 years.</div>]]>
    </content>
</entry>

<entry>
    <title>Spherification and Alcohol</title>
    <link rel="alternate" type="text/html" href="http://www.kylescholz.com/make/2012/01/spherification-alcohol.html" />
    <id>tag:www.kylescholz.com,2012:/make//5.41</id>

    <published>2012-01-30T01:15:52Z</published>
    <updated>2013-02-22T17:42:33Z</updated>

    <summary>Spherification is a &quot;Molecular Gastronomy&quot; technique for making small edible spheres out of just about anything. Since my first flavor sphere experience I&apos;ve wanted to learn more and make my own....</summary>
    <author>
        <name>kyle scholz</name>
        <uri>www.kylescholz.com</uri>
    </author>
    
    <category term="alcohol" label="alcohol" scheme="http://www.sixapart.com/ns/types#tag" />
    <category term="moleculargastronomy" label="molecular gastronomy" scheme="http://www.sixapart.com/ns/types#tag" />
    <category term="spherification" label="spherification" scheme="http://www.sixapart.com/ns/types#tag" />
    
    <content type="html" xml:lang="en-us" xml:base="http://www.kylescholz.com/make/">
        <![CDATA[<div style="text-align: left;"><a href="http://en.wikipedia.org/wiki/Spherification">Spherification</a> is a "Molecular Gastronomy" technique for making small edible spheres out of just about anything. Since my first flavor sphere experience I've wanted to learn more and make my own.</div><div style="text-align: left;"><br /></div><div><a href="http://www.kylescholz.com/make/assets_c/2012/01/DSC_0806-17.html" onclick="window.open('http://www.kylescholz.com/make/assets_c/2012/01/DSC_0806-17.html','popup','width=2170,height=1546,scrollbars=no,resizable=no,toolbar=no,directories=no,location=no,menubar=no,status=no,left=0,top=0'); return false"><img src="http://www.kylescholz.com/make/assets_c/2012/01/DSC_0806-thumb-600x427-17.jpg" width="600" height="427" alt="DSC_0806.JPG" class="mt-image-none" /></a></div><div><br /></div><div><br /></div>]]>
        <![CDATA[<div>I had the&nbsp;<a href="http://willpowder.com/packageOffers.html">Willpowder</a>&nbsp;kit for basic spherification. The instructions sound straightforward:</div><div><ul><li>Stir a quantity of Sodium Alginate into the target mixture for your spheres.</li><li>Fill a dropper or small squeeze bottle with the alginate mixture.</li><li>Drip the mixture into a bath of calcium chloride in water. The droplets will become spheres.</li></ul><div>But it wasn't that easy. I chose to start with alcohol and I had a hard time blending the sodium alginate into amaretto. They just didn't want to mix and my repeated attempts to blend them resulted in lots of air bubbles in the mixture. Worse, when I dropped the amaretto/alginate mixture into my calcium bath it splattered on the surface and spread out into a thin film. Fail.</div></div><div><br /></div><div>I had read that&nbsp;<a href="http://thespitefulchef.blogspot.com/2009/09/great-balls-of-fire.html">others had more luck using "Reverse Spherification" with alcohol</a>. I gave this a try but I could only produce large amorphous non-spheres by dunking a spoon of the mixture in the bath. Dropping from any height had the same issue as above. Also note, reverse spherification is done with calcium lactate gluconate and NOT calcium chloride. I tried. You don't want the taste of calcium chloride in your spheres!</div><div><br /></div><div>After some trial and error, I came across&nbsp;<a href="http://www.make-digital.com/make/vol14/?pg=154#pg154">an article in Make Magazine</a><span style="line-height: 18px;">&nbsp;that saved the day. The key was to first blend a mixture of sodium alginate and water to create a stable suspension. Here's a short recipe:</span></div><div><span style="line-height: 18px;"><br /></span></div><div><a href="http://www.kylescholz.com/make/assets_c/2012/01/DSC_0802-16.html"><img src="http://www.kylescholz.com/make/assets_c/2012/01/DSC_0802-thumb-600x429-16.jpg" width="600" height="429" alt="DSC_0802.JPG" class="mt-image-none" /></a></div><div><span style="line-height: 18px;"><br /></span></div><div><span style="line-height: 18px;"><b>Amaretto Spheres</b></span></div><div><span style="line-height: 18px;"><br /></span></div><div><span style="line-height: 18px;">Ingredients:</span></div><div><ul><li><span style="line-height: 18px;">2g sodium alginate</span></li><li><span style="line-height: 18px;">3g calcium chloride</span></li><li><span style="line-height: 18px;">1 1/2 C water</span></li><li><span style="line-height: 18px;">1/2 C amaretto</span></li></ul><div><span style="line-height: 18px;">Tools:</span></div></div><div><ul><li><span style="line-height: 18px;">An immersion blender.</span></li><li><span style="line-height: 18px;">A slotted spoon (with slots small enough that you can pick up your spheres).</span></li><li><span style="line-height: 18px;">A squeeze bottle or plastic syringe.</span></li></ul></div><div><span style="line-height: 18px;"><br /></span></div><div><span style="line-height: 18px;">Steps:</span></div><div><ul><li>Blend sodium alginate and 125g (about 1/2 C) of water with an immersion blender.</li><li>Set aside for a couple of hours to let bubbles disperse.</li><li>Meanwhile, make a calcium chloride bath, with 1.5g calcium chloride to 1C water*. I usually make 2 cups to fill a medium bowl.</li><li>After most of the bubbles have dispersed, add a small quantity (perhaps 1/8th) of the sodium alginate / water mixture to the amaretto. Mix with a spoon or small wisk. Load some of the amaretto mixture into a dropper or squeeze bottle and test.</li><ul><li>If the drop disperses on the surface of the bath, clean it off the surface, add more of the alginate mixture to the amaretto and try again.</li><li>Once the spheres start to hold together, you're all set. The longer the sphere sits in the bath, the more the alginate and calcium will react so you'll get thicker walls.</li></ul><li>Remove spheres from the bath within a few seconds to prevent the whole sphere from going solid. Dip in a water bath. Slosh around. Remove from water and use within a few minutes.</li></ul><div><span style="line-height: 18px;">I've found that the contents of the spheres leach out if they're left to sit for some time. You want to use them as soon as you can to preserve color and flavor.</span></div></div><div><span style="line-height: 18px;"><br /></span></div><div><span style="line-height: 18px;">* Some people insist on using distilled water for the bath, since impurities in tap water might prevent the alginate and calcium from bonding. I took this suggestion and haven't yet experimented with tap water.</span></div><div><span style="line-height: 18px;"><br /></span></div><div><span style="line-height: 18px;">Some other things I learned while spherificating:</span></div><div><ul><li><span style="line-height: 18px;">Sodium alginate is useful both for creating the bonds that form a membrane around your spheres and for thickening your target mixture. Your mixture will need to be thick enough to break the surface tension of the calcium chloride bath.</span></li><li><span style="line-height: 18px;">Dropping height matters. Again, it's all about breaking the surface tension. Experiment by dropping from different heights. Dropping height can determine whether you break the surface and dictate the shape of your spheres.</span></li><li><span style="line-height: 18px;">While creating an alginate suspension in water makes it easier to introduce alginate into your target ingredient, it will water it down. This recipe provides a 1.6% alginate solution. A thicker solution can provide a similar result while adding less water.</span></li></ul><div><span style="line-height: 18px;">Now to find something useful to do with these spheres...</span></div></div>]]>
    </content>
</entry>

<entry>
    <title>Moisture Sensor: Calibration Round 1</title>
    <link rel="alternate" type="text/html" href="http://www.kylescholz.com/make/2011/08/moisture-sensor.html" />
    <id>tag:www.kylescholz.com,2011:/make//5.39</id>

    <published>2011-08-25T04:15:42Z</published>
    <updated>2013-02-22T00:29:11Z</updated>

    <summary>I grow plants. For a time, I&apos;ve wanted a low-cost sensor that can live in my plants and broadcast information about temperature, light, water, and drainage that I can compare to ideal growing conditions. I&apos;ve set out to build such...</summary>
    <author>
        <name>kyle scholz</name>
        <uri>www.kylescholz.com</uri>
    </author>
    
    
    <content type="html" xml:lang="en-us" xml:base="http://www.kylescholz.com/make/">
        <![CDATA[<div>I grow plants. For a time, I've wanted a low-cost sensor that can live in my plants and broadcast information about temperature, light, water, and drainage that I can compare to ideal growing conditions. I've set out to build such a device. This post focuses exclusively on the moisture sensor component.</div><div><br /></div><div>Commercial grade soil moisture sensors are available, but they are cost-prohibitive&nbsp;for placing in dozens of plants, rather large, and sometimes have very high power requirements for a small device. I'll need to make this component myself.</div><div><br /></div><div>I have a handful of designs in mind for the sensor. A couple of other hobbyist projects use a variation on the gypsum block sensor:</div><div><ul><li><a href="http://www.franksworkshop.com.au/GWS/Phase2/MoistureSensor.htm">Frank's Moisture Sensor Prototype</a></li><li><a href="http://www.cheapvegetablegardener.com/blog/2009/11/08/how-to-make-cheap-soil-moisture-sensor-2/">Cheap Vegetable Gardener's Prototype</a></li></ul></div><div>I've elected for a different design because plaster is quick to absorb moisture and slow to dry. As a result, gypsum block sensors may provide a less granular measure and can inaccurately represent the wetness of the surrounding soil (perhaps I should prove this assertion?).</div><div><div><div></div></div></div><div><br /></div><div>The designs I'm considering generally share a common component:&nbsp;The sensor is a simple design involving a pair of concentric electrodes, sand as a neutral moisture medium, and a plaster disk to filter out salts or impurities that may cause errors in measurement. These parts are assembled inside a 1/2" plastic tube cap.</div><div><br /></div><div><img alt="moisture_sensors1.jpg" src="http://www.kylescholz.com/make/2011/08/25/moisture_sensors1.jpg" width="480" height="319" class="mt-image-center" style="text-align: center; display: block; margin: 0 auto 20px;" /></div><div><br /></div>]]>
        <![CDATA[<div>This is a resistive sensor that works&nbsp;when an external device applies a voltage across the electrodes. The medium between the electrodes (in this case, sand) acts as a resistor. As the moisture in the medium varies, the voltage carried across the electrodes varies. This voltage can be measured to determine how wet the medium is.</div><div><br /></div><div><img alt="moisture_sensors2.jpg" src="http://www.kylescholz.com/make/moisture_sensors2.jpg" width="480" height="319" class="mt-image-center" style="text-align: center; display: block; margin: 0px auto 20px;" /></div><div><img alt="moisture_sensors3.jpg" src="http://www.kylescholz.com/make/moisture_sensors3.jpg" width="480" height="319" class="mt-image-center" style="text-align: center; display: block; margin: 0px auto 20px;" /></div><div><br /></div><div>At the start of the test, I arranged the sensors in a pot of sand, then fully saturated the sand with water.&nbsp;The test ran for about three days, sampling (excessively) once every 30 seconds. Below is a plot of the measure taken by the four devices at 15-minute granularity.</div><div><div style="text-align: center;"><img alt="calibration1.png" src="http://www.kylescholz.com/make/2011/08/25/calibration1.png" width="600" height="371" class="mt-image-none" /></div><div>While the measurements from the four devices are relatively consistent, there's room for improvement in both precision (note the poor measurement granularity and flapping) and consistency across devices (I seem to have one "wet" sensor and one "dry" sensor). A few adjustments should offer an improvement.</div></div>]]>
    </content>
</entry>

</feed>
